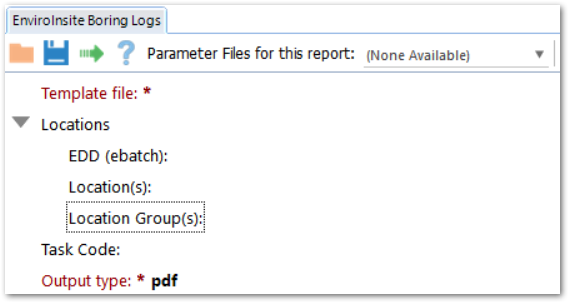
The Professional Report user interface includes three areas:
1.The top Report Toolbar, including options to save and load User Reports and Report Parameter Files.
2.The data pane on the left, which displays the report parameter tree and selected values.
3.The parameter input pane on the right, which displays a tooltip and the input options for the selected parameter.

Keyboard shortcuts are available when selecting report parameters. See the Keyboard Shortcuts article.
Known Issues
•The clickable area for input parameter selection should be highlighted.
•Using the up/down arrow in the data pane for a Multiselect parameter will make multiple selections.
Report Data Pane
|
Click a parameter name to display the available input values and make selections, and to expand or collapse the parameter node. Click the arrow icon to expand or collapse parameter nodes.
The active input parameter has a border around the parameter name.
Input values selected during the current session are shown in bold after each parameter (default values and those loaded from a saved input are not bolded).
Required parameters (ST_REPORT_PARAMETER.REQUIRED_YN = Y) have red text and an asterisk. |
The Tab key moves the cursor forward and selects the next input parameter. This includes expanding any collapsed nodes to select each child parameter.
Press Shift-Tab to move the cursor backward and select the previous input parameter.
Parameter Input Pane
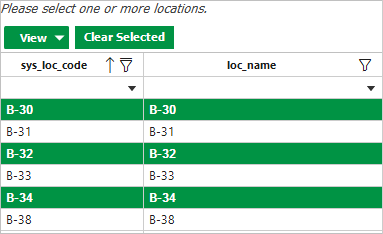
Input Value List

Click individual rows to select the desired input value(s). Selected input rows are highlighted in green. Sort the list by clicking on a column name.
Click selected rows again to unselect.
Multi-Select
To multi-select values that are listed together, click and drag the cursor over the target rows or, click the first row, hold down the Shift key, then select the last row.
Click individual rows to add the values to the selected group.
Note: Selections automatically appear in alphabetical order, with the exception of the ARII-ALEII Crosstab Report. In that report, the Column Headers and Row Headers parameters have the display type ST_REPORT_PARAMETER.DISPLAY_TYPE = “MultiSelectNonAlpha”. Parameters with this display type maintain the selected order, rather than alphabetical order. This should only affect the outcome for the Crosstab Column Headers, Row Headers and Tabbed Data parameters of the ARII-ALEII Crosstab Report. |
Filter
Apply a filter to the list as follows:
•type into the filter row and typing Enter, using the dropdown menu to select the filter condition (default = Starts With), or
•use the Filter icon in the column header and make selections from the dropdown menu, similar to a Microsoft Excel filter
A line over the filter icon denotes an active filter.
Note: Filtering does not affect selected input values.
The Row Filter and Advanced Filter (Text drop-down in the check box filter UI) will have better performance than the check box filter. The search functionality of the check box filter becomes very slow at more than 25,000 records. |
Select Clear Filter from the filter drop-down menu to remove the active column filter. Navigating away from the active input parameter and the Clear Selected button will also clear the column filter.
View
Click View to choose from three filter options: All (default), Selected or Unselected. View > All clears any column filters.
Click Clear Selected to clear selected values and column filters.
Input Types
Date Input
Type date values directly. The Date Input will automatically move between the month, day, and year, or click the green drop-down arrow to open the calendar tool to select year, month, and date values or click the gray 'Select dynamic date" drop-down arrow to select a dynamic or relative date.
As long as a dynamic date selection is displayed after a date parameter in the report parameter user interface, e.g. Start: 12/1/2000 | First day of the week, saving the parameters of the report to a file or a user report will save the dynamic date SQL script. Otherwise, just the value of the date parameter will be in the saved XML file or user reports.
Note: Some inputs do not automatically move to the next field, 1, 2, and 3 for example as day inputs, because 15, 21, and 30 may also be valid. Pressing '/', '.', arrow or return keys, in this case, will move to the next field. |
Boolean Input
Select True/False values by clicking the check box that appears to the right of the parameter names or by pressing the Space Bar key.
Text Input
Type text values into the text box to the right of the parameter name.
