|
•Migrate a Facility via T-SQL Script |
EQuIS Facility Migration allows for easy facility migration between databases.
In order to use the Facility Migration tool, the following conditions need to exist for both the destination and source databases:
a.Same SQL Server database version and compatibility level, where possible.
b.Same EQuIS Schemas applied. These can be checked in the VW_DB_VERSION view in EQuIS Professional. This view can be accessed by clicking one of the "Open" buttons on the Home tab of the ribbon when logged into the database, then clicking the Views button of the Open window.
c.Same build of each EQuIS Schemas applied. These can also be checked in the VW_DB_VERSION view, specifically the VERSION column. These numbers are explained further on the Build and Version Numbers page.
d.Same Test Alternate Key (TAK) exists in Source and Destination databases.
e.Logins to each database (preferably with the administrator role assigned for an Enterprise login, or with a SQL login)
f.Matching reference values for the data being migrated. See the Exporting and Importing RTs page for how reference values can be exported from the source database into the target database.
Migration Tool
•Can only migrate between EQuIS 6 and later databases due to EUIDs.
•Pre-v6.4 databases need to have the ST_ID_MAP table added to their schema prior to migrating facilities from them. Contact EarthSoft Support for standalone scripts to add this table to pre-v6.4 databases.
Migrate a Facility
1.Connect to the destination EQuIS facility where the data will be migrated into.
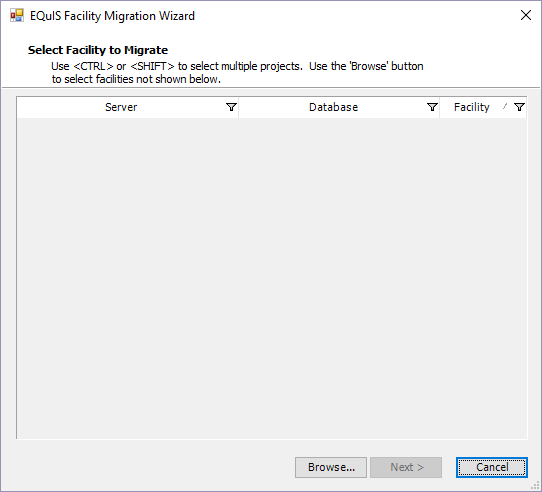
2.Click EQuIS Facility from the Home EQuIS Ribbon Import section. The EQuIS Facility Migration Wizard will open.
3.Click Browse and double-click to select the source facility.

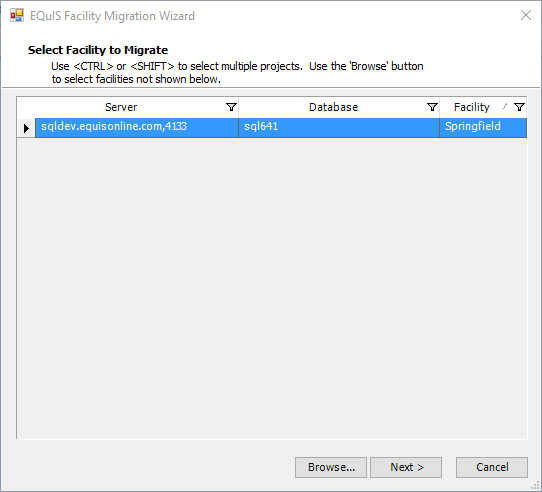
4.Click your Facility to select it. Click Next.

To select multiple facilities, use <CTRL> or <Shift>. <CTRL>-click will highlight multiple facilities, while <Shift>-click will select all of the facilities in-between two selected facilities. Please note that you can add multiple facilities by continuing to click on the Browse button.
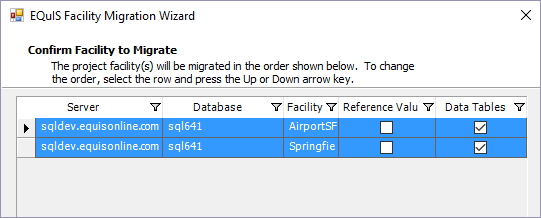
5.Click Next and select the check box for the options to be migrated.
It is only necessary to migrate the Reference Values when migrating to a new database. If migrating to a current database, the Reference Values will already be set. In the case that you do not need to migrate the Reference Values, check the Data Tables box only.
6.Click Migrate.

The time frame for migration is contingent upon the amount of data being migrated. Migration is most often complete within a few minutes. Some errors may occur when migrating. Once the migration has completed, choose to accept the migration (with any errors that may have occurred) or cancel the migration. The migration process is an Insert process by default. The insert type can be changed to an Update process if desired, which replaces existing records (except if new data is NULL, then it does not replace). Instructions on how to change the import type is discussed below in the Change Migration Mode section. This is important to note if migrating a facility to an EQuIS database that already exists.
Note: Not all tables are migrated. This tool omits certain system tables such as ST_* and XT_*. |
View Migration Errors - Save and Review Error Log
1.Click Save in the lower-right, or right-click anywhere in the grid and select Save.
2.The error log allows you to work to resolve any warnings or errors by providing information about the given rows.
3.Open the error log where it was saved and view the data.
The error log will provide general information about the data rows. If a warning is shown, the data was not migrated. Note that the facility migration code has been updated so that only action levels with DT_ACTION_LEVEL.FACILITY_ID populated will be associated with the new FACILITY_ID upon migration. If the FACILITY_ID is NULL in the source table, it will be left NULL in the new database.
Selectively Exclude Tables
The "MigrateFacilitySkipTables" appSettings option in the EQuIS.exe.config (typically at C:\Program Files\EarthSoft\EQuIS or, for per-user installation, %localappdata%\Programs\EarthSoft\EQuIS\) allows you to selectively skip tables during a migration. Multiple tables are separated by a pipe symbol "|". For example, the following appSettings will exclude DT_ACTION_LEVEL, DT_ACTION_LEVEL_PARAMETER, and DT_FILE from the migration process.
<add key= "MigrateFacilitySkipTables" value="dt_action_level|dt_action_level_parameter|dt_file" /> |
The same setting can also be added to ST_CONFIG.
config_section |
config_key |
object_type |
object_value |
string_value |
|---|---|---|---|---|
MigrateFacility |
SkipTables |
dt_action_level|dt_action_level_parameter|dt_file |
Increase Max Errors
The default Max Errors allowed is 5000. This value can be increased by adding an ST_CONFIG setting and putting the desired limit into string_value:
config_section |
config_key |
object_type |
object_value |
string_value |
|---|---|---|---|---|
MigrateFacility |
MaximumErrors |
10000 |
There is also a setting that can be added to the EQuIS.exe.config file (typically at C:\Program Files\EarthSoft\EQuIS):
<add key= "MigrateFacilityMaximumErrors" value="10000" /> |
Change Migration Mode
The Facility Migration tool defaults to attempting to add data by insert only. This config setting allows you to define which tables should have a different commit mode. These settings should be applied in the target database (database running the facility migration wizard in). The following ST_CONFIG table shows the three object_value types that can be used:
1.The first is '*' and this will apply the mode to every table.
2.The next is the table prefix: dt_, rt_ or st_ which apply the mode to any table with that prefix.
3.The last is a table name itself, which will apply the mode to that table only.
When determining which mode to use for a given table, the migration tool will use the most narrow focused setting (i.e. specific table record over a prefix record, and a prefix record over the '*' record):
config_section |
config_key |
object_type |
object_value |
string_value |
|---|---|---|---|---|
MigrateFacility |
TableInsertMode |
Table |
* |
Update |
MigrateFacility |
TableInsertMode |
Table |
dt_ |
Insert |
MigrateFacility |
TableInsertMode |
Table |
dt_action_level |
Update |
The above ST_CONFIG table would produce the following modes when migrating. All rt_ tables would be migrated as Update; all dt_ tables would be migrated as Insert, except that DT_ACTION_LEVEL would be migrated as Update.
Migrate a Facility via T-SQL Script
The process described above will migrate data from the source facility to the target facility, regardless of where each database resides. The migration will download the data from the source database to EQuIS Professional and then upload the data from EQuIS Professional to the target database. This process works well when both databases are accessible via a local area network.
However, if both the source database (containing the facility being migrated) and the target database are SQL Server Databases that reside in the same instance of SQL Server, then you may have better performance using T-SQL migration script. If applicable, the EQuIS Facility Import tool can automatically generate a T-SQL script that can be executed in SQL Server Management Studio. The script will use INSERT INTO ... SELECT FROM statements to copy data from the source database to the target database. The benefit of this approach is that the data is not downloaded to EQuIS Professional. Instead, the data is copied directly from one database to the other on the database server.
The T-SQL facility migration script's INSERT INTO statements function as an INSERT ONLY commit type. The script does not perform INSERT and UPDATE as the Professional Facility Migration tool does.
While the Facility Migration Tool has the option to create a T-SQL Script to be executed in SQL Server Management Studio (SSMS) for the migration of a facility, this option does not yet support Azure databases.
Migrate a Facility via Script
1.Connect to the destination EQuIS facility where the data will be migrated into.
2.Click EQuIS Facility from the Home EQuIS Ribbon Import section. The EQuIS Facility Migration Wizard will open.

3.Click Browse and double-click to select the source facility.
4.Select the facility and click Next.

5.Select the check box for the options to be migrated.
It is only necessary to migrate the Reference Values when migrating to a new database. If migrating to a current database, the Reference Values will already be set.

6.Do not click the Migrate > button. Instead, double-click the selected row in the grid.
7.The saved SQL script will open in SQL Server Management Studio
8.Connect to the appropriate SQL Server instance. If desired, save the SQL script for your records.
9.Execute the script to migrate the facility.
Note: An error may result if the EUID column is missing from tables (e.g. a blank output):
Prior to generating the scripts, it is first necessary to ensure that the EUID column is present on all tables. This is done by running the following script on both the source and target databases; this process can be completed in SQL Server Management Studio (SSMS).
exec equis.add_euid '','' |
Known Issues with the Script:
•The script at first pass will not run. It produces 4 errors near a semi-colon. In each of those cases, the line of T-SQL is missing a close-parenthesis right before the semi-colon at the end of the line.
Suggested workaround: Add the missing close-parenthesis.
•The geography data type cannot be migrated because of the use of "Select Distinct" rather than "Select" in the script.
Suggested workaround: Change from "Select distinct" to "Select" for DT_GEOGRAPHY.
•The T-SQL statements are not wrapped in a transaction.
Suggested workaround: Add Begin Transaction / Commit Transaction statements (and perform a Rollback if the statements fail).
•The T-SQL tool is not currently supported for Azure databases. Whether or not the standard EQuIS Professional Facility Migration Tool can support Azure is still in testing.
